What do we want? Continuous Integration! When do we want it? All the damn time!
We’re big fans of automation at Keboola, and we want the folks that work with our infrastructure to have as easy of a time as possible…

We’re big fans of automation at Keboola, and we want the folks that work with our infrastructure to have as easy of a time as possible. With that in mind, this is a short tutorial about how to set up continuous integrations for the Keboola Connection component that you’ve been working on.
Because we despise doing mundane repetitive tasks manually, we thought it would be nice that when a component where updated, it would automatically performed the following tasks:
- Build the new image
- Run unit tests
- Push the new image to Keboola
- Run production environment test jobs with the new image
- and if everything passes, deploy and publish the new image
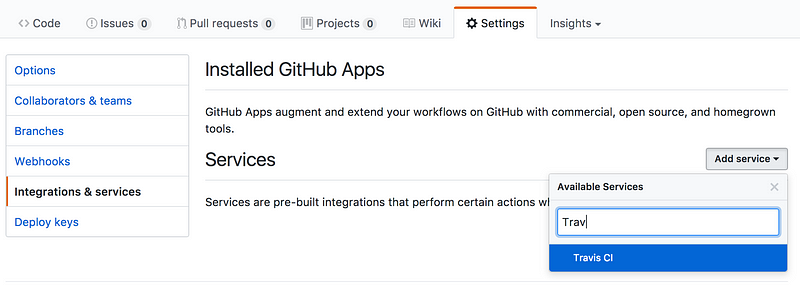
The main thing we’ll need to accomplish this is integration with Travis CI. Which means we’ll need a .travis.yml file in the root directory of our repository (here’s a sample from the docker-demo-app), and we’ll need to activate Travis integration in our github repo as shown below:
Let’s take a closer look at that .travis.yml file. Just like in our wishlist above, there are 3 main tasks we want to accomplish: build, test, and deploy. These correspond to the sections of our travis file before_script, script, and deploy.
The before-script portion is the most straight forward, it simply builds our image (the tag latest is automatically attributed to the built image). Note that in this case we have one image for the application docker-demo-app contained in APPLICATION_IMAGE and one for tests docker-demo-app-tests contained in APPLICATION_TESTS_IMAGE. Then it runs the unit tests.
One note about environment variables, to set up environment variables in travis, visit https://travis-ci.org/[your_github_name]/[repository_name] and open the settings panel as shown below.
Testing
We run the unit tests in the previous section so that if they fail the master tag image will not be deployed.
Let’s examine what is happening line by line:
10 — This line runs the test image. This test image usually has unit tests as it’s entrypoint and can involve other code quality steps such as sniffing and linting. In our example, the test image uses the Code Climate service in addition to unit tests. If it fails, the script section will not be executed
12 — Here we fetch the developer portal CLI to interact with the Keboola developer portal.
13 — We use the CLI tool to fetch the repository location for our registered keboola connection component which will be contained in the REPOSITORY variable. Take note of the environment variables you’ll need to have defined here: KBC_DEVELOPERPORTAL_USERNAME, KBC_DEVELOPERPORTAL_PASSWORD,
KBC_DEVELOPERPORTAL_VENDOR (the vendor name that the app is registered under), and KBC_DEVELOPERPORTAL_APP (the id of your application).
14 — Now we tag our new image as $REPOSITORY:master . We will use the master tag to run our production tests.
15 — In order to push our new image we need to log in to the developer portal.
16 — Push the master tag image
18 — We pull the helper tool which will allow us to run Keboola Connection component jobs. This should probably be part of the developer-portal CLI tool above, but pobody’s nerfect.
19 — We run a job using the master tagged image of our component on the supplied configuration. Here KBC_CONFIGURATION_ID is the configuration id of a configuration of the component in our test project, and KBC_STORAGE_TOKEN is a storage token ideally created solely for this purpose in the project that has your test configuration(s).
And that’s all she wrote for tests.
Deployment
The last section of the travis file is for deployment. It will run the deploy.sh bash script when a new tag is pushed to the master branch of our github repository.
You should recognise the top section from lines 12–16 of the the .travis.yml. The difference here is that we are not pushing the master tag, but rather 2 different tags: latest and $TRAVIS_TAG where TRAVIS_TAG contains the value of the tag that we pushed to our github repo, ideally a semantic version number such as 0.1.2 or v0.1.2.
The last command uses the CLI tool to update the developer portal reference to our component to use the TRAVIS_TAG version of our image. Keboola automatically synchronises live components with their latest version from the developer portal every 5 minutes, so within a few minutes all instances will be using your latest version.
TLDR; If you set this up then all you need to do to update your Keboola component is push a tag to your github repository and crack open a Tab™.