PHP serverless application in AWS (part 1)
AWS Lambda, the backbone of serverless applications in AWS, currently supports Java, Go, PowerShell, Node.js, C#, Python, and Ruby…
AWS Lambda, the backbone of serverless applications in AWS, currently supports Java, Go, PowerShell, Node.js, C#, Python, and Ruby languages. If you’ve ever wanted to use serverless architecture with your PHP applications, it is now possible, thanks to the features AWS announced in November 2018:
- Lambda Layers — a way to centrally manage code and data shared across multiple functions.
- Lambda Runtime API — a simple interface to use any programming language, or a specific language version, to develop your functions.
These features allow developers to use virtually any programming language to write their lambda functions.
In this blog post, we look at how to write a simple API app in PHP using the Serverless and Bref frameworks, the latter providing the PHP runtime so we don’t have to write our own.
To handle the dependencies of the app and to easily test it locally, we will use Docker and Docker Compose.
AWS
You will need an AWS account to deploy your app to AWS using the Serverless framework.
Create one following this guide and then paste your AWS credentials into an .env file:
#.env
AWS_ACCESS_KEY_ID=****
AWS_SECRET_ACCESS_KEY=****
This solution is just for the sake of this tutorial. I don’t recommend using user credentials this way in production. In our production apps, we use different roles for the deployment and execution of our Lambda functions. Check out this guide to learn how Serverless works with AWS roles, or check out our Serverless demo app for an example of a more secure solution.
We are also in the process of developing a new solution to work with AWS policies for our serverless applications using AWS pipelines. I might write about it in a future blog post.
Docker
We will use Docker to manage the dependencies of our app and create environments for development, testing and deployment. First, we create a Dockerfile. We use keboola/docker-amazonlinux-php as our base image. This base image is the Amazon Linux image used by AWS Lambda with PHP installed on top — you can see its Dockerfile here. It’s also possible to use one of the images provided by Bref.
Let’s take a look at our Dockerfile. In addition to the base image, we are installing Node, Yarn, and Composer, to install the PHP dependencies and Serverless framework.
The WORKDIR is also important: “/var/task” is the path where the AWS Runtime API expects the function code to be.
#Dockerfile
FROM keboola/docker-amazonlinux-php:latest

# install node, yarn and composer
RUN curl --silent --location https://rpm.nodesource.com/setup_12.x | bash -
RUN curl --silent https://dl.yarnpkg.com/rpm/yarn.repo > /etc/yum.repos.d/yarn.repo
RUN yum -y install findutils nodejs npm yarn python27 wget
RUN curl -sS https://getcomposer.org/installer | php -- --install-dir=/usr/local/bin/ --filename=composer

# working directory
WORKDIR /var/task
COPY . .

# install composer dependencies
RUN composer install

# install serverless
RUN yarn global add serverless@1.57
Now we create the docker-compose.yml file. Docker Compose simplifies the running of different Docker services. We will have two services “deploy” and “tests”. As the names suggest, “tests” will be used for testing and development purposes and “deploy” for deployment to AWS. There’s also a third service called “tests-local”, which extends the “tests” service. The only difference between the two is that “tests-local” has a mapped volume, which is useful during development as changes to the code are propagated into the container and vice versa. We also pass the AWS credentials into the containers from the .env file.
#docker-compose.yml
version: "3"
services:
  deploy:
    build:
      context: .
    environment:
      - AWS_ACCESS_KEY_ID
      - AWS_SECRET_ACCESS_KEY
    command: serverless deploy --force
  tests: &tests
    build:
      context: .
    environment:
      - AWS_ACCESS_KEY_ID
      - AWS_SECRET_ACCESS_KEY
    command: composer ci
  tests-local:
    <<: *tests
    volumes:
      - .:/var/task
Add the composer.json file:
{
  "name": "keboola/hello-world-bref",
  "license": "MIT",
  "type": "project",
  "description": "Hello World with bref",
  "keywords": [ "keboola", "bref", "hello", "world" ],
  "authors": [
    {
      "name": "Keboola",
      "email": "devel@keboola.com"
    }
  ],
  "autoload": {
    "psr-4": {
      "Keboola\\HelloWorldBref\\": "src/"
    }
  },
  "autoload-dev": {
    "psr-4": {
      "Keboola\\HelloWorldBref\\Tests\\": "tests/"
    }
  },
  "require": {
    "php": "^7.3",
    "ext-json": "*",
    "bref/bref": "^0.5.12"
  },
  "require-dev": {
    "phpunit/phpunit": "^7.1"
  },
  "scripts": {
    "tests": "phpunit",
    "ci": [
      "@composer validate --no-check-all --strict",
      "@tests"
    ]
  },
  "config": {
    "sort-packages": true
  }
}
Let’s install the dependencies using the “tests-local” container:
(The dependencies were already installed in the Dockerfile, but the working directory inside the container was then replaced by the mapped volume from the local disk. Installing the dependencies now will also install them into our local directory.)
Bref framework
The Bref framework is still quite young, but it’s developing very quickly and provides an easy solution to make PHP work in the AWS Lambda environment. Check out the Bref documentation for more information about this framework.
Initialize the Bref framework:
$ docker-compose run --rm tests-local ./vendor/bin/bref initFrom the options choose [0] PHP function. This will generate a very simple configuration file serverless.yml, for the Serverless framework with following content:
#serverless.yml
service: app
provider:
  name: aws
  region: us-east-1
  runtime: provided
plugins:
  — ./vendor/bref/bref
functions:
  function:
    handler: index.php
    description: ''
    layers:
      — ${bref:layer.php-73}
We specify here that we want to use the “provided” runtime, and then, in “functions” we specify exactly which “layer” (runtime) we want to use.
The ${…} notation is the syntax to use variables in serverless.yml. Bref provides a Serverless plugin (“./vendor/bref/bref”) that provides these variables:
- ${bref:layer.php-74}
- ${bref:layer.php-73}
- ${bref:layer.php-72}
- ${bref:layer.php-74-fpm}
- ${bref:layer.php-73-fpm}
- ${bref:layer.php-72-fpm}
- ${bref:layer.console}
Bref currently provides runtimes for PHP 7.2, 7.3, and 7.4. You can read more in the Bref documentation.
One confusing aspect about Bref is figuring out which layer to choose. Our generated files now use “${bref:layer.php-73}”, and when you look at the generated “index.php” file, we see our code is wrapped in the “lambda()” function. This function handles the communication with the AWS Runtimes API.
The FPM runtime layer also incorporates a loop, in which it listens for incoming API Gateway events, forwards them to our handler running in a php-fpm process, and returns a response in a format compatible with API Gateway. In other words, it does some of the work for us, but for this tutorial I will use the non-FPM runtime because this way, I have access to the raw API Gateway event data, which is not available in the FPM/Website style.
(I noticed that there’s already an issue about this exact problem, so the FPM/website style should support access to the event data soon: https://github.com/brefphp/bref/pull/501).
Replace the content of the index.php file with:
<?php
declare(strict_types=1);
require __DIR__.'/vendor/autoload.php';
lambda(function ($event) {
    return [
        'statusCode' => 200,
        'body’ => json_encode('Hello world from PHP in Lambda'),
    ];
});
And add routing information for API Gateway into the serverless.yml file.
I’ve also modified the “service” and “function” names.
#serverless.yml
service: php-hello-world
provider:
  name: aws
  region: us-east-1
  runtime: provided

plugins:
  - ./vendor/bref/bref

functions:
  api:
    handler: index.php
    description: ''
    layers:
      - ${bref:layer.php-73}
    events:
      - http: 'ANY /'
      - http: 'ANY /{proxy+}'
You can now deploy your function to AWS:
$ docker-compose run --rm deployIf the deployment is successful, you should see the address of the API Gateway endpoint for your API in the output of the deploy command.
endpoints:
 ANY - https://xpc2xj29n4.execute-api.us-east-1.amazonaws.com/dev
 ANY - https://xpc2xj29n4.execute-api.us-east-1.amazonaws.com/dev/{proxy+}
After opening this endpoint in your browser you should see:
“Hello world from PHP in Lambda”
More complex application
Now we will refactor our code to create something that at least resembles an actual, real-world application. Let’s first modify the serverless.yml file. We add two different path templates into our function event declaration:
#serverless.yml
functions:
  api:
    handler: index.php
    description: ''
    layers:
      - ${bref:layer.php-73}
    events:
      - http:
          method: get
          path: "/{name}"
      - http:
          method: post
          path: "/"
We now modify the index.php file to create a “front controller”:
<?php
declare(strict_types=1);
use Keboola\HelloWorldBref\App;
require __DIR__.'/vendor/autoload.php';
lambda(function ($event) {
    $app = new App();
    $resourceMap = [
        '/{name}' => [
            'GET' => function ($event) use ($app): array {
                return [
                    'statusCode' => 200,
                    'body' => json_encode(
                        $app->getHelloWorld($event)
                    ),
                ];
            },
        ],
        '/' => [
            'POST' => function ($event) use ($app): array {
                return [
                    'statusCode' => 201,
                    'body' => json_encode(
                        $app->postHelloWorld($event)
                    ),
                ];
            },
        ],
    ];
    try {
        if (empty($event['httpMethod'])
            || empty($event['resource'])
        ) {
            throw new \Exception('Bad Request', 400);
        }
        if (empty($resourceMap[$event['resource']])) {
            throw new \Exception('Route Not Found', 404);
        }
        $resource = $resourceMap[$event['resource']];
        if (empty($resource[$event['httpMethod']])) {
            throw new \Exception('Method Not Allowed', 405);
        }
        $actionFn = $resource[$event['httpMethod']];
        return $actionFn($event);
    } catch (\Throwable $e) {
        return [
            'statusCode' => 500,
            'body' => json_encode([
                'errorMessage' => $e->getMessage(),
            ])
        ];
    }
});
The $resourceMap array serves as a router. Based on the path and the http method of the event, the appropriate function from the App class will be called.
We haven’t made the App class yet, so let’s create it in the src/App.php file:
<?php

declare(strict_types=1);

namespace Keboola\HelloWorldBref;

class App
{
    public function getHelloWorld($event)
    {
        return sprintf(
            'Hello %s',
            $event['pathParameters']['name']
        );
    }

    public function postHelloWorld($event)
    {
        $body = json_decode($event['body'], true);
        return sprintf('Hello %s', $body['name']);
    }
}
Deploy the app (don’t forget to rebuild the “deploy” image):
$ docker-compose build deploy && docker-compose run --rm deployYou might encounter an error like:
An error occurred: ApiGatewayResourceNameVar — A sibling ({proxy+}) of this resource already has a variable path part — only one is allowed
In that case, you need to delete the Cloud Formation stack created by the Serverless deploy manually via AWS console and run the deploy again or use this workaround. :) If you delete the stack, it will delete the API Gateway endpoint, so after another deployment the endpoint will be different.
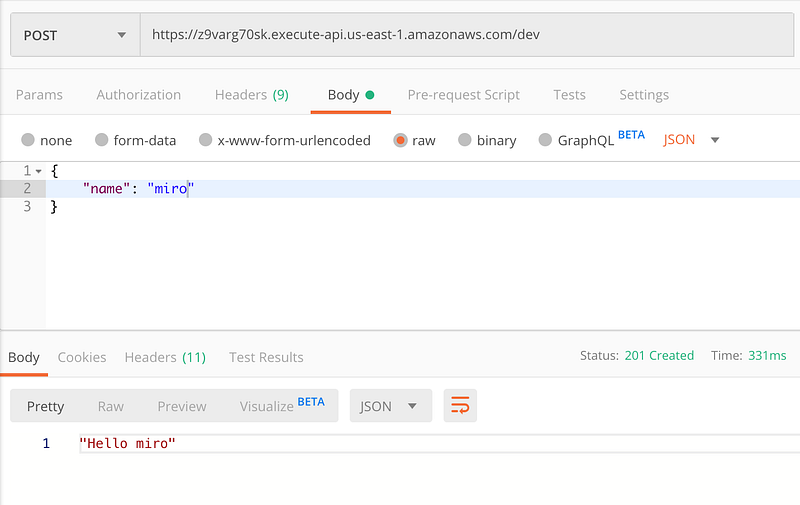
After a successful deployment, our API can now respond to two types of https requests:
- GET requests with “name” as a path parameter, which should result in a response like “Hello miro”, for example, with status code 200.
- POST requests with a JSON payload like:
{ “name”: “miro” }, resulting in the same response with status code 201.
Unit testing
The reason we created the App class was not only to better structure our code but also to easily write unit tests for our App class. A simple unit test placed in the tests/AppTest.php file might look like this:
<?php

declare(strict_types=1);

namespace Keboola\HelloWorldBref\Tests;

use Keboola\HelloWorldBref\App;
use PHPUnit\Framework\TestCase;

class AppTest extends TestCase
{
    public function testGetHelloWorld()
    {
        $app = new App();
        $event = [
            'pathParameters' => [
                'name' => 'miro'
            ]
        ];

        $this->assertEquals('Hello miro', $app->getHelloWorld($event));
    }

    public function testPostHelloWorld()
    {
        $app = new App();
        $event = [
            'body' => json_encode([
                'name' => 'miro'
            ])
        ];

        $this->assertEquals('Hello miro', $app->postHelloWorld($event));
    }
}
To run the phpunit test suite, we need a phpunit.xml.dist config file:
<?xml version=”1.0" encoding=”UTF-8"?>
<phpunit backupGlobals=”false”
 backupStaticAttributes=”false”
 colors=”true”
 convertErrorsToExceptions=”true”
 convertNoticesToExceptions=”true”
 convertWarningsToExceptions=”true”
 processIsolation=”false”
 stopOnFailure=”false”
 bootstrap=”vendor/autoload.php”>
 <testsuite name=”Tests”>
 <directory>tests/</directory>
 </testsuite>
</phpunit>
Run the test suite:
$ docker-compose run --rm tests-local ./vendor/bin/phpunitAll tests should be green. :) You might have noticed that I’m manually creating the API Gateway events in the tests. You can check the API Gateway event structure here under “Example “LAMBDA-PROXY” event (default)”.
What we are not testing is the output of the Bref wrapper “lambda” function. We will look at this in the next blog post.
Here’s the source code for this example application.
Conclusion
Developing even a simple serverless application requires a good knowledge of many tools, frameworks, and services, not to mention using custom runtime for unsupported languages such as PHP. So, I hope this brief guide will help you navigate the serverless waters a bit better.