Formatting JavaScript code using Prettier automatically — in a container
For the last few months, I have been working on the new User Interface for one of our products. More specifically, I’m creating a Single Page Application which consumes one of our APIs.
That app is bootstrapped with Create React App (CRA), and uses Redux, Redux Form, Found router, etc.
I’m using Docker as a development environment. Obviously. I have a simple Dockerfile with Node.js and standard installation of the Yarn package manager.
FROM node:7

RUN apt-get update -q \
  && apt-get install apt-transport-https \
  && wget https://dl.yarnpkg.com/debian/pubkey.gpg -O pubkey.gpg \
  && apt-key add pubkey.gpg \
  && echo "deb https://dl.yarnpkg.com/debian/ stable main" > /etc/apt/sources.list.d/yarn.list \
  && apt-get update -q \
  && apt-get install yarn -y
All I have to do to start the development is type this simple command:
docker-compose up node
# or docker-compose run --rm --service-ports node
Node modules are mounted through volume, so there’s nothing special in docker-compose.yml for development, just one service which mounts the current working directory to a container.
version: "2"

services:

  node:
    build: .
    ports:
      - "3000:3000"
    volumes:
      - ./:/code
    working_dir: /code
    tty: true
    command: sh -c 'yarn && yarn start'
CRA has a built-in linter, so there are no problems with committing “smelly” code — it prevents doing this kind of things.
But there’s one problem, which CRA won’t solve for you. It’s code formatting. I’m not working on the mentioned app just by myself, but we still want the code to look as if it was written by one person. At least when it comes to its formatting.
There are endless discussions in teams, how the code should be formatted. Tabs or spaces? Here you are. A solution how to end this “war” is to format code automatically — no matter what the developers write.
CRA provides a good manual to help you set up automated code formatting. It recommends using a set of three libraries, namely Husky, Lint-staged and Prettier.
Installation of these tools is pretty straightforward, so I’m not going to elaborate on theyarn add command. You’ll end up with package.json similar to this.
{
  ...
  "dependencies": {
    "husky": "^0.14.3",
    "lint-staged": "^4.0.4",
    "prettier": "^1.6.1",
    ...
  },
  "scripts": {
    "precommit": "lint-staged",
    ...
  },
  "lint-staged": {
    "src/**/*.js": [
      "prettier --print-width 100 --single-quote --trailing-comma es5 --write",
      "git add"
    ]
  }
}
After installing Husky, you can check your .git/hooks directory and see that Husky installed a bunch of hooks. The most important hook in this case is pre-commit, because the code should be formatted before we commit it.
All installed hooks have almost the same code.
#!/bin/sh
#husky 0.14.3

command_exists () {
  command -v "$1" >/dev/null 2>&1
}

has_hook_script () {
  [ -f package.json ] && cat package.json | grep -q "\"$1\"[[:space:]]*:"
}

cd "."

# Check if precommit script is defined, skip if not
has_hook_script precommit || exit 0

load_nvm () {
  # If nvm is not loaded, load it
  command_exists nvm || {
    export NVM_DIR=/root/.nvm
    [ -s "$1/nvm.sh" ] && . "$1/nvm.sh"
  }

  # If nvm has been loaded correctly, use project .nvmrc
  command_exists nvm && [ -f .nvmrc ] && nvm use
}

# Add common path where Node can be found
# Brew standard installation path /usr/local/bin
# Node standard installation path /usr/local
export PATH="$PATH:/usr/local/bin:/usr/local"

# nvm path with standard installation
load_nvm /root/.nvm

# Check that npm exists
command_exists npm || {
  echo >&2 "husky > can't find npm in PATH, skipping precommit script in package.json"
  exit 0
}

# Export Git hook params
export GIT_PARAMS="$*"

# Run npm script
echo "husky > npm run -s precommit (node `node -v`)"
echo

npm run -s precommit || {
  echo
  echo "husky > pre-commit hook failed (add --no-verify to bypass)"
  exit 1
}
It is well documented and basically it will only:
- check your
package.jsonif you have a particular hook installed - try to load
nvm - check if you have
npminstalled - and try to execute the specific hook
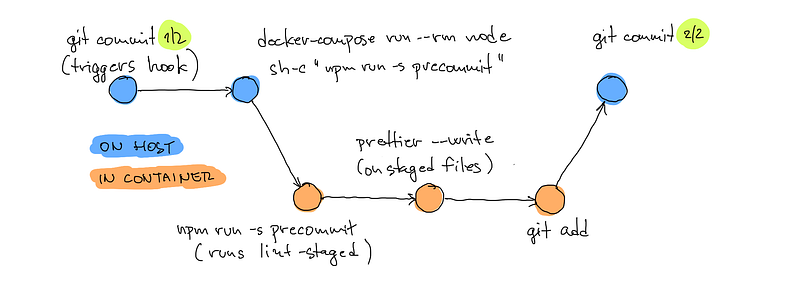
All of this is executed on your host, unless you’re running git in a container (I’ll cover that case later in this post). So all the Git tools you’re using will trigger and execute the hooks.
But there’s one problem. I do not have npm, nvm nor node installed on my host machine. Everything is running in the container, my host provides only resources. How to solve it?
My first idea was to run npm, node, etc. the same way I run Travis CLI. It can work, but there will be inconsistency between node and npm on the host and in the container. Not good. Maybe if I had only one project to work on, it would work. But I want a more stable solution.
My second thought was to run everything in the container. I’ll setup all I want, versions will match. Promising, but I realized I don’t want to commit from the container. I don’t want to punish myself. I want my git-cola and its simple UI. Nothing like using git from the container will happen.
I had the pre-commit file opened and started checking if there’s some magic and how Husky set up the hooks for me. The shell script looked fine, I understood everything and it was only a matter of time before I figured out something. And that happened.
There is a simple command_exists function which executes the command command (yep) and checks if the command (passed as a parameter) is available.
Boom! I can move the entire command to run in the container.
docker-compose run --rm node sh -c 'command -v "npm"'So the command_exists function will look like this:
command_exists () {
  COMMAND_TO_SH="command -v \"$1\" >/dev/null 2>&1"
  docker-compose run --rm node sh -c "$COMMAND_TO_SH"
}
Also, I do not need nvm, so I can comment or remove the load_nvm function. There’s also printing of the node version (node -v), which I can run the same way.
And finally, an update of the precommit command:
docker-compose run --rm node sh -c 'npm run -s precommit' || {
  echo
  echo "husky > pre-commit hook failed (add --no-verify to bypass)"
  exit 1
}
Nice! Now the pre-commit hook is doing what it’s supposed to do and I don’t have to worry about which versions of libraries will be used.
The cons
There’s always something like “it’s working, but …”. And that’s also the case here.
- In this project I cannot commit only specific hunks/lines, because the whole file is marked for reformatting (check the
git addcommand in thepackage.jsonfile). - Also the speed is not so great and I have to wait about 5 seconds for the formatting task. Not really a big deal, since I’m not committing 720 times a day (1 hour wasted).
The slowness is caused by running the container 3 times (and mounting the whole node_modules each time). We can save ~1 second by removing node -v and another ~1 second by removing the check for npm existence. Finally, compared to the run in the container (~1.2s) we’ll be slower by ~1 second (~2.3s). Not bad.
The final script with only 1 container run may look like the code block below.
#!/bin/sh
#husky 0.14.3

has_hook_script () {
  [ -f package.json ] && cat package.json | grep -q "\"$1\"[[:space:]]*:"
}

cd "."

# Check if precommit script is defined, skip if not
has_hook_script precommit || exit 0

# Add common path where Node can be found
export PATH="$PATH:/usr/local/bin:/usr/local"

# Export Git hook params
export GIT_PARAMS="$*"

# Run npm script
echo "husky > npm run -s precommit"
echo

docker-compose run --rm node sh -c 'npm run -s precommit' || {
  echo
  echo "husky > pre-commit hook failed (add --no-verify to bypass)"
  exit 1
}